Tag Archives: cupcake blog

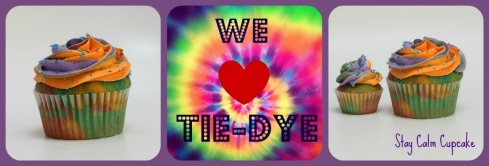
Funky Fresh Tie-Dye Cupcakes

18 Apr

What is more fun than Tie-Die?! Well, Tie-Die Cupcakes, of course! These colorful cupcakes are the perfect addition to any birthday party. With a simple vanilla base, the recipe is quick and virtually impossible to mess up. Get creative with your own color combinations and make your next party funky fresh!

Here’s the recipe – Enjoy!

Tie-Dye Cupcakes

Makes 15-18 Cupcakes

You’ll Need:

~ 2 cups all-purpose flour
~ 1 ½ cups sugar
~ 1 tablespoon baking powder
~ ½  cup milk

~ ¾  cup water
~ 1 teaspoons pure vanilla extract
~ ½  cup butter, softened
~ 3 eggs

~ 3 different colors of food coloring

Directions:

  1. Pre-heat your over to 350 degree
  2. With a whisk, combine flour, sugar, baking powder
  3. Add in the milk and whisk to combine.
  4. Add water, vanilla, butter, and eggs. Combine with an electric mixer then beat two more minutes.
  5. Divide the batter into 3 small bowls
  6. Color each bowl of batter a different color
  7. Line your cupcake pan with cupcake liners
  8. 8. Starting with one color, put a spoonful of batter into each liner
  9. Alternate colors until cupcake liners are ¾ full
  10. Bake at 350 for 12-15 Minutes.

Vanilla Frosting

  • 2 Sticks of unsalted butter at room temperature
  • 4 cups of powdered sugar
  • 2 tbs of vanilla extract
  • 3 colors of food coloring

In an electric mixer cream the butter until light and fluffy. I usually beat on medium speed for 3-4 minutes.

Slowly add in one cup of powdered sugar at a time. Mixing in between each addition

Add in the vanilla extract, mix to combine

(If your frosting is too thin – add more powder sugar. If your frosting is too thick, add in a tbs of milk.)

How to decorate with multi-colored frosting

  • Separate the frosting into 3 small bowls. Using food coloring, color each bowl a different color.
  • Cut the tip off your piping bag, insert the piping tip.
  • Use a medium size cup and fold the piping bag over the edges – this makes it easier to fill the piping bag with frosting.
  • Using a spoon or spatula, put one of the colored frostings into the piping bag. Alternate colors until your piping bag is filled with multi-colored frosting.
  • Pipe frosting onto each cupcake. Add sprinkles if you desire.

There you have it! Let me now f you have any questions.

Until next time, Stay Sweet!

Jill

Red Velvet Cupcakes

7 Oct


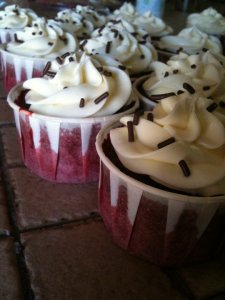
Happy Friday! It feels so good to know that in a few hours, my weekend will be here! I recently made red velvet cupcakes for a friends birthday and rembered just how much I love this recipe. Its such a great recipe that I am recycling this post from when I originally posted in over a year ago. Enjoy!

~~~~~~~~~~~~~~~~~~~~~~~~~~~~~~~~~~~~~~~~~~~~~~~~~~~~~~~~~~~~

Red Velvet cake and I used to have a bittersweet relationship…I could never get the recipe “just right”. That was until I found a recipe that I actually like, and am capable of creating. I adapted this recipe from Bobbly Flay’s show “Throwdown with Bobby Flay”. Enjoy the recipe, and enjoy all the praises you’ll get when you pass these little guys out.

Red Velvet Cupcakes

adapted from “Throwdown with Bobby Flay”

Makes 16 Large cupcakes – 24 regular size cupcakes

Ingredients

For the cupcakes:

  • 2 cups all-purpose flour
  • 1 1/4 teaspoons baking soda
  • 1 1/4 teaspoons salt
  • 4 tbs unsweetened cocoa powder
  • 1 1/2 cups vegetable oil
  • 1 ½  granulated sugar
  • 1 1/4 cups buttermilk
  • 3  large eggs
  • 2 tsp of red food coloring
  • 1/8 cup of water
  • 2 tsp of vanilla
  • 1 ¼ tsp of vinegar (white or apple cider)

Directions

Preheat oven 350 degrees F.

Sift together flour, baking soda, salt, and cocoa powder into a bowl and set aside. (**Sifting is very important here – I usually skip sifting, but I don’t skip it in this recipe because without sifting, your cupcakes won’t be fluffy and moist.)

In a mixer fitted with the paddle attachment, mix oil, sugar, and buttermilk until combined. Add eggs, food coloring, vinegar, vanilla and water and mix well. Add the dry ingredients a little bit at a time and mix on low, scraping down sides occasionally, and mix until just combined. Be sure not to over mix, or the batter will come out tough.

Line your cupcake pan with paper liners, scoop the batter into the liners and bake at 350 degrees F for 20 to 30 minutes or until the toothpick comes out clean. Let cool

 Cream Cheese Frosting

  • 2 packages of 8 oz. Cream Cheese
  • 3 cups of powdered sugar
  • 1 tbs of vanilla extract
  • 1 tbs heavy whipping cream
  • 2 Sticks of unsalted Butter

Cream together cream cheese and butter – Mix on high speed up soft and well combined

Add the powder sugar one cup at a time – mixing thoroughly after each cup

Add in the vanilla and mix well

Beat on medium high speed until desired consistency is achieved.

ENJOY!!

Summer Flower Cupcakes

27 Jun


Summer Lovin'

Hello my loves! Today I am so excited to share a super fun recipe with you!

This weekend I was asked to cater a special “going away” luncheon. I decided to make summer flower cupcakes. They were so easy and the guests loved them! The set up and decorations were really fun too.

Let’s get started!

Summer Flower Cupcakes

Ingredients for the Cake

• 6 cups white flour sifted

• 2 tablespoons baking powder

• 1 1/2 cups butter or margarine, softened

• 3 cups granulated sugar

• 2 cups milk

• 2 tbs of Vanilla Extract

• 12 egg whites

Directions for the Cake

1. Preheat oven to 325°F. Fill cupcake pan with cupcake liners.

2. Sift together flour and baking powder. Set aside.

3. Cream butter and sugar together until light and fluffy. Set aside.

4. Beat egg whites until stiff, but not dry. Set aside.

5. With mixer at slow speed, add flour mixture to butter mixture, alternately with milk.

6. Beat well after each addition. Beat in vanilla extract.

7. Gently fold egg whites into batter.

8. Pour into cupcake liners.

9. Bake for 18-20 minutes.

Bright Colored Marshmallows make these flowers POP!

Ingredients for the frosting and the decoration:

  • One bag of mini, colored marshmallows
  • 1 stick of unsalted butter (softened)
  • 1 stick of salted butter (softened)
  • 4 cups of powdered sugar (sifted)
  • 3 tbs of half and half
  • 1 tbs of vanilla

Directions

  1. In your stand mixer, cream the butter on medium high until it turns white and fluffy (about 5 minutes)
  2. Add the powdered sugar one cup at a time- mixing on medium speed
  3. Add the half and half and the  vanilla – mix well for 2 minutes or until well combined
  4. If you want thicker buttercream – add more powdered sugar.
  1. Once your frosting is finished, set aside
  2. Cut the mini marshmallows is half, creating little petals
  3. After your cupcakes have cooled completely, frost them. For best results, I used a piping bag to pie the frosting in a swirl on the cupcake. This gave the cupcakes a more polished look once the petals were placed on top.
  4. Starting at the outside edge of the cupcake, place the petals all around. Do this for 3 layers. Finish by putting a different color marshmallow in the center. I used yellow.

***Important note: These cupcakes should not be left uncovered or refrigerated, it makes the marshmallow petals dry put and look shriveled up.

Perfect Little Flower Pots

For the display, I used some pots from the gardening section of my local grocery store, covered them with some ribbon, and placed Styrofoam inside of them. I covered the Styrofoam with some green “grass” and placed the cupcakes on skewers and stuck them into the pot. It turned out really cute and people were amazed at how creative the cupcakes were. The best part was, these cupcakes were one of the easiest things I have done in a while.


These cute cupcakes are a must for your next event! Let me know if you have any questions about the recipe.


Stay sweet!

xoxo, Jill


I Need a Cupcake Fix!

19 May

Apple Spice and Buttercream

As much as I’m loving being part of the Shop Til You Drop Blog Crawl, I am desperately missing the sweet presence of cupcake on my blog! So I am going to remedy that with a delicious recipe for Apple Spice Muffin Cupcakes. Yum!!

Ingredients


• 2 1/2 cups all purpose flour
• 1 1/2 cups sugar
• 1 cup finely chopped, peeled apple
• 1/2 cup chopped walnuts
• 1 teaspoon baking powder
• 1 teaspoon baking soda
• 1/2 teaspoon salt
• 1 1/2 teaspoon cinnamon
• 1/2 teaspoon freshly grated nutmeg
• 2 large eggs
• 1 1/2 cups applesauce
• 1/2 cup melted butter

Directions

Combine all dry ingredients in a large mixing bowl.  Add eggs, butter, and applesauce.  Mix for 2 minutes at slow speed.  Scrape bowl.  Mix at medium speed for 1 minute.  Scrape bowl, and stir in chopped apples and walnuts.

Your oven should be preheated to 350 degrees.  spoon cupcake batter into cupcake pans lined with paper or foil cupcake liners.

Bake your cupcakes for 15-20 minutes.  Remove from pan, and cool completely on a wire rack.

Top with Buttercream Frosting and Enjoy!

Marshmallow Love!

11 May

Marshmallow Whip Frosting

To be honest, I often get tired of using classic vanilla frosting for my cupcakes. I know it’s a favorite of many, but I like to mix it up a little. This Marshmallow frosting is the perfect way  to add some variety your cupcakes!

It’s a great addition to chocolate cupcakes, lemon cupcakes, strawberry cupcakes, or my favorite..coconut cupcakes! Enjoy xo

Looks Delish!

Marshmallow Whip – From the book “Baking: From my home to yours”

1/2 cup egg whites (about 4 large)
1 cup sugar
3/4 teaspoon cream of tartar
1 cup water
1/2 tablespoon pure vanilla extract – 1/2 tablespoon of Marshmallow flavoring

  1. Put the egg whites in your mixer bowl or in another large bowl – Make sure the bowl you use is 100% dry.
  2. Put the sugar, cream of tartar and water in a small saucepan and stir to combine. Bring the mixture to a boil over medium-high heat, cover the pan and boil for 3 minutes.
  3. Uncover your saucepan and allow the syrup to boil until it reaches 242 degrees F on the candy thermometer. While the syrup is cooking, start beating the egg whites on medium-low speed.
  4. Remove mixture from heat – let cool until temperature reaches 235 degrees.
  5. When the syrup is at about 235 degrees F, begin beating the egg whites on medium speed with the whisk attachment or with a hand mixer. If the whites form firm, shiny peaks before the syrup reaches temperature, reduce the mixer speed to low and keep mixing the whites until the syrup catches up. With the mixer at medium speed, and standing back slightly, carefully pour in the hot syrup, pouring it between the beater(s) and the side of the bowl.
  6.  Add the vanilla and marshmallow flavoring and keep beating the whites at medium speed until they reach room temperature, about 5 minutes.

Use Marshmallow Frosting for a Smore's Cupcake!

Don’t forget to to join in on the Shop Til You Drop Blog Crawl! Another great giveaway starts tomorrow!

~*~ All images are from weheartit.com ~*~

You Owe My Mom a Thank-You

6 May

Celebrate your Mom on May 8th

If you’re asking “Why on earth do I need to say thank you to this chick’s mom?”, let me help clear things up for you.

Almost a year ago, my mom gave a little bag full of cupcake related goodies. Some stickers, a cupcake mug, some notecards, and a magnet. The set of note cards said “Keep Calm and Eat a Cupcake”. It was then that I was inspired to start my “Stay Calm, Have a Cupcake” blog and from there, open up my online cupcake store, “Stay Calm Cupcake Shop”.  See? You really do owe my Mom a thank you – without her, this blog might not even exist! 🙂

For some reason the 6  simple words on that set note cards really resonated with me. It was a message so simple and so obvious – just stay calm!

I began blogging shortly after with the philosophy that cupcakes are the perfect 5 minute escape from the craziness that can surround us at times. It’s just as important to me now, as it was a year ago, to remind each of you to take a few moments for yourself. Breath deeply, stop worrying, and eat a cupcake. Not because it takes good, or because it’s the “chic” dessert at the moment, but because we all need a couple of minutes to re-group. And honestly, you deserve it! It’s ok to quietly admit we feel overwhelmed while we sit down and take the first calming bite of a delicious vanilla cupcake with homemade buttercream frosting.

So this is for you Mom. Thanks for inspiring me to slow down and continue to pursue my dreams of baking in a greater way than I could have ever imagined.

Happy Mother’s Day to all Mom’s who have undoubtedly inspired your children in one way or another!

Stay Sweet and Stay Calm! The solution is only a cupcake away!

xoxo, Jill

Sweet Tooth Inspiration

26 Apr

So Simple - So True

Every now and then, I like to browse the pages of weheartit.com to find some delcious cupcake inspiration. Please enjoy today’s really sweet photo inspirations!

Sweet Sugary Stars

I just think these blue and yellow star cupcakes are so adorable. They would be perfect for a little boy baby shower! I don’t know why, but I love the combination of light yellow and pastel blue!

Simple and Elegant

Piping frosting in the shape of a rose is a classic! These cupcakes look so delightfully elegant with the pastel decorations on each of them.

Cupcake Garden!

I am officially obsessed with this idea! Baking chocolate cupcakes in little pots and using frosting or fondant to make little sprigs of grass and leaves. It is just too adorable!! I’m making these ASAP!

Breakfast Cupcakes

These cupcakes give me a legitimate excuse to eat cupcakes for breakfast! Come on, you know you still love Fruit Loops, putting them on a cupcake is nothing short of genius!

Cookie Dough Deluxe

This reminds me that I still need to post the recipe for cookie dough frosting….I’m warning you, it’s highly addictive. I’m talking so addictive you might not get to frost your cupcakes because you ate it all. Wait..I didn’t do that 🙂

Well that’s all for today my sweets. Hope you are all having a fabulous Tuesday. Stay Sweet!

xoxo, Jill

Cupcake Fillings

22 Mar

I cannot tell you how many frustrated evenings I have spent trying to fill cupcakes with various creams, jams, and candies. I think every cupcake baker – at one time or another has felt this same irritation. If you cut a hole in each cupcake, it takes forever , if you just jam your filling tip into the cupcake, you don’t have enough room for the filling, and if you use an apple corer you end up taking too much cake out….oh the perils of  filling a cupcake – haha.

Cupcake Corer!

Not to worry, my dear cupcake lovers – I have found a solution!! Williams-Sonoma sells a “Cupcake- Corer” – perfect for all your cupcake filling needs. The best part about this product is that it only costs $5.00 – what a deal!! You simply push the corer into your cupcake and pull up. There you have it, a perfectly hollowed cupcake! The corer does all the work for you! I have read the reviews and they all seem positive. I wish I could give you my own review, but sadly enough I do not have this wonderful cupcake corer yet. I tried to order it online but it was “temporarily out of stock”. It is available in their store though – which is where I’ll be purchasing mine soon!

So what type of fillings are you going make now that cupcake filling is made simple?? I love a double berry filling but I also really enjoy a creamy Peanut Butter filling inside of a moist chocolate cupcake.

Peanut Butter Filled Chocolate Cupcakes

Peanut-Butter Filling

  • 2 sticks of unsalted butter
  • 4 cups of powdered sugar
  • 1 tsp of vanilla flavoring
  • 2 cups of Peanut Butter
  • 2 tsp of milk

In your mixer, on medium high,  cream together the butter and the peanut butter. This usually take 2-5 minutes to achieve the proper consistency

Add your powdered sugar one cup at a time, mixing in between each cup

Continue mixing on medium high for 1 minute

Add your vanilla and your milk – mix for another minute. You’re frosting should be thick and creamy. If it is not the consistency you want, continue mixing for another 2 minutes.

Fill your chocolate cupcakes with this creamy deliciousness and enjoy!! Top with chocolate or peanut butter frosting – nothing is better!

Stay Sweet,

Jill xoxo

Comfort Food Cupcakes

18 Feb

Photo courtesy of weheartit.com


Happy Friday my sweets!

Today I decided that I am going to post any green, four-leaf clover, St.Patrick’s day posts until March! Lately I have felt like the department stores, preparing for the next holiday before the previous one is even over. Valentine’s Day just ended and we have a good amount of time before we celebrate with the Irish. So I’m going to take a break on holiday postings. Is that ok with you guys?

Today I want to share with you one of my all time favorite, comfort food cupcake recipes. I don’t know about you, but I have had a pretty long, fairly stressful week. So this cupcake comes just in time – for me at least.

Nothing says homemade better than a carrot cake cupcake with bits of nuts, raisins, and delicious spices. Top it off with rich, tart, cream cheese icing, and this gal is in cupcake heaven. So please enjoy this recipe and remember that when life gets a little hectic, Stay Calm, and Have a cupcake! Xoxo

Carrot Cake Cupcake

(I used Marthat Stewart’s recipe and adapted it just a tad)

Makes 12 cupcakes – 24 minis

Ingredients:

  • 1 cup granulated sugar
  • 1/3 cup vegetable oil
  • 2 tablespoons orange juice
  • 1/2 teaspoon pure vanilla extract
  • 2 large eggs
  • 1 teaspoon baking powder
  • 1/2 teaspoon baking soda
  • 1/2 teaspoon ground allspice
  • 1/2 teaspoon salt
  • 3/4 cup plus 2 tablespoons all-purpose flour (spooned and leveled)
  • 1 1/2 cups shredded carrots
  • 1/2 cup chopped walnuts
  • 1/2 cup of rasins

 Directions:

  • Preheat oven to 350 degrees.
  • In a bowl, combine sugar, vegetable oil, orange juice, 1/2 teaspoon vanilla extract, and eggs.
  • Stir in baking powder, baking soda, allspice, and salt. Add flour; mix.
  • Stir in carrots, raisins, and walnuts
  • Divide batter evenly among muffin cups. Bake until toothpick inserted in centers comes out clean, 25 minutes. Let cool completely before frosting.

 Creamy Dreamy Cream Cheese Frosting

  • 2 packages of 8 oz. Cream Cheese
  • 3 cups of powdered sugar
  • 1 tbs of vanilla extract
  • 2 Sticks of unsalted Butter

Cream together cream cheese and butter – Mix on high speed up soft and well combined

Add the powder sugar one cup at a time – mixing thoroughly after each cup

Add in the vanilla and mix well

Beat on medium high speed until desired consistency is achieved.

ENJOY!!

So Yummy! I'm baking these tonight!

Stay Sweet!

Xoxo, Jill

Red Hot Cupcakes

7 Feb

Spice Up Valentine's Day!

I love the idea of a Red Hot cupcake! It is the perfect recipe for spicing things up a bit on Valentine ’s Day.

Unfortunately, when I looked around for a good recipe, I couldn’t seem to find one that wasn’t a) super complicated or b) filled with tons of actual spices. I’m not against using real spices, but I really wanted my cupcake to taste like the little red hot candies vs spicy chili powder and cinnamon.

I combined a few recipes and came up with my own way to flavor it just the way I wanted to!

Ingredients

  • 1 cup white sugar
  • 1 cup of butter (divided)
  • 2 eggs
  • 2 teaspoons vanilla extract
  • 1 1/2 cups all-purpose flour
  • 1 3/4 teaspoons baking powder
  • 1/2 cup milk
  • 2 cups of Red Hots
  • Additional ½ cup of sugar

Directions

  1. Preheat oven to 350 degrees F.
  2. Line your cupcake pan with paper liners
  3. In a medium sauce pan on low heat add your Red Hots, 1/2 cup of sugar,1/2 cup of butter, 3 tbs of water
  4. Let the Red Hots melt. Stirring continually so it doesn’t burn
  5. Let simmer until most of the Red Hots have melted and mixed in with the sugar and butter.
  6. In a medium bowl, cream together 1 cup of sugar and ½ cup of butter. Beat in the eggs, one at a time, then stir in the vanilla.
  7. Pour in your red hot liquid – mix well
  8. Combine flour and baking powder, add to the creamed mixture and mix well. Stir in the milk until batter is smooth.
  9. Pour or spoon batter into the prepared pan.

10. Bake 20 to 25 minutes

For the frosting, I think a Marshmallow Whip is the perfect addition. Decorate with Red Hots and enjoy!