Tag Archives: stay calm cupcake blog

Key Lime Pie Cupcakes

21 Feb

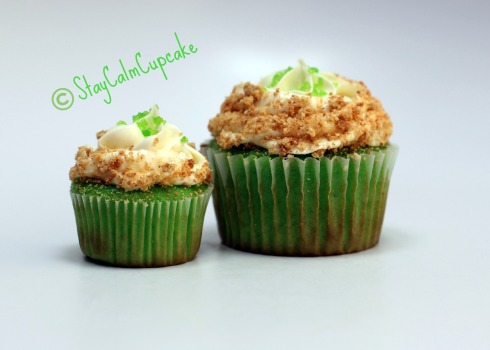
So here it is friends, the long awaited and much requested Key Lime Pie Cupcake recipe! Just in time for all of the  green festivities that St. Patrick’s Day brings us next month.

This tart and tangy, sweet and sassy cupcake certainly packs a punch. It is a guaranteed hit with anyone who loves Key Lime Pie as much as I do….which admittedly, is too much! 🙂

Enjoy!

Key Lime Cupcake

Makes 24 Cupcakes

Cupcake Ingredients:

  • 6 cups cake flour sifted
  • 2 tablespoons baking powder
  • 1 1/2 cups butter or margarine, softened
  • 3 cups granulated sugar
  • 2 cups milk
  • 2 tsp Vanilla Extract
  • 8 egg whites
  • 1 Lime
  • 3 tbs of Lime Jello Mix (dry)

Directions:

  1. Preheat oven to 325°F. Fill Cupcake pan with liners
  2. Sift together flour and baking powder. Set aside.
  3. Cream butter and sugar together until light and fluffy. Set aside.
  4. Beat egg whites with hand mixer until stiff, but not dry. Set aside.
  5. With your stand mixer at slow speed, add flour mixture to butter mixture, alternately with milk. Beat well after each addition.
  6. Add in 3 tbs of dry Lime Jello mix – mix well to incorporate
  7. Beat in 1/3 cup of lime juice
  8. Beat in vanilla extract.
  9. Gently fold egg whites into batter.
  10. Pour batter into prepared pans.
  11. Bake for 18-22 minutes or until tops are lightly browned and toothpick comes out clean.


Whip Cream Frosting

  • 1 (8 ounce) package of cream cheese, softened
  • 1/2 cup white sugar
  • 2 teaspoons vanilla extract
  • 2 cups heavy cream

Combine the cream cheese, sugar, and vanilla extract in the bowl of your stand mixer. Use the whisk attachment and mix on medium speed until smooth.

While the mixture is still whipping, slowly pour in the heavy cream.

Stop and scrape the bottom of the bowl a couple of times while you continue.

Continue mixing until the frosting can hold a firm peak. Do not over beat though.

Decorations:

  • The zest of one lime
  • 15 graham crackers, crushed
  • Lime green sanding sugar

Once your cupcakes have cooled and your frosting is ready – pipe frosting onto each cupcake. Place the graham cracker crumbles on a plate and roll the edge of the cupcake in the crumbs. Sprinkle each cupcake with lime zest. Finish with a few lime green sugar sprinkles.

There you  have it! Fun, festive, and delicious!!  Until next time, Stay Sweet!

Xo, Jill

It’s Been A Year!

15 Sep

Today is a very special day for me and I’m excited to share it with you all. One year ago today I opened up Stay Calm Cupcake Shop. It’s cliché to say, but I honestly can’t believe how fast the time has gone by.
In the past year I have learned so much about myself, my passion for cupcakes, the importance of a great customer, and the best way to be successful in an industry that’s always changing. I want to share a few key things that helped me succeed over the past year. I think these are important things to remember when running your own shop.

Stay Calm Cupcake

1. Do what makes you happy, even if you think it’s impossible! I thought that running a successful online shop and having a full time day job would be impossible. It’s not impossible; it just takes a bit of hard work and alot of dedication.

2. Promote your shop like it’s your job – because it is! I never let a day go by when I don’t post, comment, or interact on social media sites. Make Twitter, Facebook, Pinterest, Instagram your best friends! They are free tools to help you network and promote your shop.

3. Give people more than they expect. I can’t tell you the many times I’ve given people free cupcakes, surprise samples in the mail, or extra goodies in an order. A little thoughtfulness goes such a long way with your customer.

4. Blog! I love blogging, and don’t post as often as I should. But I can tell you that my inspiration comes from all of the amazing bloggers I interact with on a daily basis. Blogs are great for getting inspiration, support, and even publicity. I would not have been so successful this year had it not been for blogs like: The Cupcake Blog, Sock It To Me, Mrs. Stephanie T, Delightful Designs, It’s Simple Love, and so so so many others who supported and promoted my shop!

5. Trust your customer. Feedback is key. Listen to what your customers are telling you and react accordingly. Without a solid customer base, I would have nothing. It’s important to keep that in mind!

6. Lastly – Make friends with other shops. Don’t be afraid of competition. Sometimes a little healthy competition is good 🙂 I have met so many incredible etsy shop owners that have more than inspired me to improve my shop.

So, what’s next for Stay Calm Cupcake?

Right now I am developing some very yummy fall flavors including Halloween, Thanksgiving, and Christmas treats. I am working with a designer to launch my own website, and am continuing to look for a cupcake truck to purchase. I’m happy to report that my dream of owning and operating the StayCalmCupcake Truck is closer now than ever. I can’t share too much right now, but I’ll keep you posted 🙂 I also continue to cater parties and deliver to locals in the Volusia County, Florida area. Things are moving along nicely! I couldn’t feel more blessed.

Again, thank you for all the support and cupcake purchases over the past year! I cherish all of you and look forward to many more years of successful cupcake baking!

Use code “SweetYear” for a 25% off discount on any single item in my shop. Offer good Until October 1, 2011

Stay Sweet Friends! xoxo

I Need a Cupcake Fix!

19 May

Apple Spice and Buttercream

As much as I’m loving being part of the Shop Til You Drop Blog Crawl, I am desperately missing the sweet presence of cupcake on my blog! So I am going to remedy that with a delicious recipe for Apple Spice Muffin Cupcakes. Yum!!

Ingredients


• 2 1/2 cups all purpose flour
• 1 1/2 cups sugar
• 1 cup finely chopped, peeled apple
• 1/2 cup chopped walnuts
• 1 teaspoon baking powder
• 1 teaspoon baking soda
• 1/2 teaspoon salt
• 1 1/2 teaspoon cinnamon
• 1/2 teaspoon freshly grated nutmeg
• 2 large eggs
• 1 1/2 cups applesauce
• 1/2 cup melted butter

Directions

Combine all dry ingredients in a large mixing bowl.  Add eggs, butter, and applesauce.  Mix for 2 minutes at slow speed.  Scrape bowl.  Mix at medium speed for 1 minute.  Scrape bowl, and stir in chopped apples and walnuts.

Your oven should be preheated to 350 degrees.  spoon cupcake batter into cupcake pans lined with paper or foil cupcake liners.

Bake your cupcakes for 15-20 minutes.  Remove from pan, and cool completely on a wire rack.

Top with Buttercream Frosting and Enjoy!

FREE Printable Cupcake Toppers

5 Apr

Cute Cupcake Toppers - for FREE!

I used to think that cupcake toppers were unnessecary. I used ot think that if you took the time to put something on a cupcake, it should be edible. But…I have changed my mind. I’m a female, so I’m allowed to!

I have slowly grown to love the idea of cupcake toppers. Mostly for their versatility in design and simplicity in execution.  Cute little designs glued back-to-back with a toothpick stuck in the middle – such adorable finishing touch to any cupcake!

Cupcake toppers are great for personalizing birthday parties, office parties, and holiday parties. Here is a collection of FREE cupcake topper cut-outs. All you have to do is print them, assemble them, and use them!

I recently used cupcake toppers for a little girl’s 2nd birthday party I catered– they were pink and blue with baby elephants! The toppers really did add the perfect finishing touch to the cupcakes. Enjoy the freebies, and happy decorating!

Stay Sweet!

xoxo, Jill

Comfort Food Cupcakes

18 Feb

Photo courtesy of weheartit.com


Happy Friday my sweets!

Today I decided that I am going to post any green, four-leaf clover, St.Patrick’s day posts until March! Lately I have felt like the department stores, preparing for the next holiday before the previous one is even over. Valentine’s Day just ended and we have a good amount of time before we celebrate with the Irish. So I’m going to take a break on holiday postings. Is that ok with you guys?

Today I want to share with you one of my all time favorite, comfort food cupcake recipes. I don’t know about you, but I have had a pretty long, fairly stressful week. So this cupcake comes just in time – for me at least.

Nothing says homemade better than a carrot cake cupcake with bits of nuts, raisins, and delicious spices. Top it off with rich, tart, cream cheese icing, and this gal is in cupcake heaven. So please enjoy this recipe and remember that when life gets a little hectic, Stay Calm, and Have a cupcake! Xoxo

Carrot Cake Cupcake

(I used Marthat Stewart’s recipe and adapted it just a tad)

Makes 12 cupcakes – 24 minis

Ingredients:

  • 1 cup granulated sugar
  • 1/3 cup vegetable oil
  • 2 tablespoons orange juice
  • 1/2 teaspoon pure vanilla extract
  • 2 large eggs
  • 1 teaspoon baking powder
  • 1/2 teaspoon baking soda
  • 1/2 teaspoon ground allspice
  • 1/2 teaspoon salt
  • 3/4 cup plus 2 tablespoons all-purpose flour (spooned and leveled)
  • 1 1/2 cups shredded carrots
  • 1/2 cup chopped walnuts
  • 1/2 cup of rasins

 Directions:

  • Preheat oven to 350 degrees.
  • In a bowl, combine sugar, vegetable oil, orange juice, 1/2 teaspoon vanilla extract, and eggs.
  • Stir in baking powder, baking soda, allspice, and salt. Add flour; mix.
  • Stir in carrots, raisins, and walnuts
  • Divide batter evenly among muffin cups. Bake until toothpick inserted in centers comes out clean, 25 minutes. Let cool completely before frosting.

 Creamy Dreamy Cream Cheese Frosting

  • 2 packages of 8 oz. Cream Cheese
  • 3 cups of powdered sugar
  • 1 tbs of vanilla extract
  • 2 Sticks of unsalted Butter

Cream together cream cheese and butter – Mix on high speed up soft and well combined

Add the powder sugar one cup at a time – mixing thoroughly after each cup

Add in the vanilla and mix well

Beat on medium high speed until desired consistency is achieved.

ENJOY!!

So Yummy! I'm baking these tonight!

Stay Sweet!

Xoxo, Jill

Left-Over Cupcake Batter

15 Feb

Freeze! Don't throw it away!

I can’t tell you how many times I have made a full bowl of batter just to make 6 little cupcakes! I finally decided that I would try freezing my left-over batter in a glass pyrex container. I didn’t know if it would work or not, but it was better than wasting all the left-overs. The next time I needed to make cupcakes, I took the batter out, let it thaw ahead of time, and made my cupcakes as usual. I anxiously tasted the cupcakes after they had cooled, and to my wonderful surprise, they were fabulous, and still so fresh!! An added perk? When baked,  the thawed batter formed the most beautiful cupcake peaks!

I have saved myself so much time and money with this simple trick. So here are a few pointers for saving your batter:

  1. I have tried saving in both plastic and glass Tupperware. I wasn’t happy with the way the plastic Tupperware preserved my batter. I now use soley glass Tupperware with a very secure lid.
  2. Frozen batter only lasts for 7-10 days in the freezer. Any longer and it doesn’t rise or taste good at all. The sooner you can use it, the better.
  3. Make sure all of the air is released from the Tupperware. The more air you have, the more ice crystals will form. No one like frostbitten cupcake batter!
  4. Don’t use the microwave to thaw your batter. Give your batter a few hours to thaw before you are going to bake.
  5. Make sure you label your batter with the flavor and the date – that way you don’t forget what it is, or when you first made it.

I hope this trick saves you as much time and money as it has saved me! Have a sweet day!

Xoxo, Jill

Monday Pick-Me-Up Cupcake

31 Jan

Coffee Cupcakes!

Alright, as promised, here is a yummy cupcake recipe to kick off your week right!

Dark Chocolate Coffee Bean Cupcakes

Cupcake:

  • 1 1/8 cups all-purpose flour
  • 1/4 cup Ghirardelli Unsweetened Cocoa
  • 1 1/4 teaspoons baking soda
  • 1/4 teaspoon salt
  • 1 large egg
  • 1/2 cup firmly packed light brown sugar
  • 1/2 cup granulated white sugar
  • 1/2 cup and 2 tbs of whole milk  
  • 1/3 cup strongly brewed coffee
  • 1/2 cup unsalted butter, melted

Directions:

  • Preheat the oven to 350 degrees F. Line Cupcake Pan with liners
  • Sift together the flour, cocoa, baking soda, and salt.
  • In a mixer on medium speed, whisk together the egg, brown sugar, and white sugar. Add in the milk, coffee, and melted butter.
  • Slowly whisk in the dry ingredients.
  • Bake for 15 minutes.

Frosting

  • 1 teaspoon instant coffee granules
  • 2tbs of brewed coffee
  • 1/4 cup milk
  • 1/4 cup unsweetened cocoa powder
  • 6 tablespoons butter or margarine
  • 1 1/2 teaspoons vanilla extract
  • 4 cups confectioners’ sugar – add more for a thicker consistency

Directions:

  1. Cream Butter and powdered sugar in a mixer on medium high speed.
  2. Mix together instant coffee, brewed coffee, milk, cocoa powder, vanilla extract
  3. Add to mixer and whisk on medium high for about 3 minutes or until desired consistency is reached.
  4. Put in piping bag and frost your cupcakes
  5. Garnish with coffee beans or chocolate shavings if desired

The perfect morning pick-me up or after dinner treat! Enjoy!

Xoxo,

Jill

**Image courtesy of http://ladylorien.tumblr.com/page/2 **

Sprinkles, Aprons and Minis

28 Jan

Happy Friday everyone!

I don’t know about you – but I am so glad the weekend is here! Today’s post is a mix-up of a few different things (all cupcake related though..of course!)

Every wonder how professional cupcake bakers get the perfect amount of sprinkles around the edge of their frosted cupcake? Me too, until I just tried it and realized it’s not hard at all!

Once you’re cupcake is frosted, pick out the type of sprinkles you want to use. Pour 1.5 Tablespoons of sprinkles into the palm of your left hand. Holding the cupcake in your right hand, dip the edge of the cupcake’s frosting in the sprinkles – rotate the cupcake’s edge in the sprinkles until you have made a complete circle. Fill in any spots that aren’t covered and VOILA – a very professional looking sprinkle job!!

Whats better than sprinkles?!!?

But what about looking the part?? Every cupcake baker needs an apron! My new sponsor Apron Queen  has just what you are looking for! Her shop is filled with the most adorable aprons and gloves!

Here are some of my favorites:

Cupcake Apron for Cupcake Baking!

"Diva Dish Gloves" by Apron Queen

Everyone looks cute in Pink Polka Dots!

 Stop by and check out her shop – if you don’t see a pattern you like, she will be happy to create a custom design just for you! I’m still trying to decide which apron I want to buy!


Feel like cupcakes but don’t feel like making them yourself? Good news…Today’s Special on Stay Calm Cupcake Shop is a 6 pack of Mini Cupcakes for only $3.00!! Head on over and order yours while supplies last.

Stay Sweet!

Xoxo, Jill

Coconut Pecan Frosting

13 Jan

Coconut Pecan Goodness!

Since I’m on this coconut kick, I decided to make German Chocolate cupcakes. And no German Chocolate cupcake is complete unless it has the traditional coconut pecan frosting. It’s the perfect mix of sweet and nutty that compliments the bitter chocolate cupcake so well.

This was my first time making this frosting, so I went to the trusted Martha Stewart cupcake book for her take on the frosting.

Here’s the recipe, with a few of my own little tweaks and notes:

Coconut Pecan Frosting

Makes enough for one 9-inch 3-layer cake (or 36 cupcakes!)

Ingredients

  • 3 large egg yolks
  • 1 can (12 ounces) evaporated milk
  • 1 1/4 cups packed light-brown sugar  (I used dark brown for a richer flavor and really liked the result!)
  • 1 1/2 sticks (12 tablespoons) unsalted butter, cut into small pieces and brought to room temperature
  • 1 teaspoon pure vanilla extract
  • 1/4 teaspoon salt
  • 2 2/3 cups (7 ounces) sweetened flaked coconut (Make sure you chop up the coconut. Sometimes the strings in the bag are way too long and makes for messy eating)
  • 1 1/2 cups (6 ounces) pecans, toasted and coarsely chopped (I did not toast mine, bc I think it gives a very strong pecan flavor that over powers the frosting – but it’s a matter of preference)

Directions

  1. Combine egg yolks, evaporated milk, and brown sugar in a saucepan. Add butter, and cook over medium heat, stirring constantly, until thick, about 10 minutes. (Should be the consistency of pudding)
  2.  Pour through a fine sieve into a bowl.
  3. Stir in vanilla, salt, coconut, and pecans. Let cool completely. Frosting can be refrigerated in an airtight container for up to 1 day; bring to room temperature before using.

Enjoy this frosting on top of any chocolate dessert! Stay Sweet xoxo

Coconut Cream Cupckes

10 Jan

A perfect little getaway!

Coconut is the type of food that people either LOVE or HATE! I fall on the LOVE side of the argument. I love everything about coconut, from the texture, to the flavor, to the smell. I can’t get enough of it. If you are like me, then this cupcake is the perfect way to indulge in your coconut obsession. A moist coconut cupcake filled with milky coconut cream, and topped with vanilla buttercream and toasted coconut flakes. Divine!

Coconut Cream Cupcakes

Makes 2 dozen

  • 3 cups cake flour (not self-rising)
  • 2 teaspoons baking powder
  • 1 teaspoon salt
  • 3 sticks (1 1/2 cups) unsalted butter, room temperature
  • 2 1/4 cups sugar
  • 1/2 teaspoon pure vanilla extract
  • 1 cup coconut milk
  • 8 large egg whites
  • 1 1/4 cups shredded sweetened coconut

Preheat oven to 350 degrees. Line two standard 12-cup muffin pans with paper liners; set aside.

In a medium bowl, whisk together flour, baking powder, and salt

In the bowl of an electric mixer fitted with the paddle attachment, beat butter and 2 cups sugar until light and fluffy, 3 to 4 minutes, scraping down sides of the bowl as needed. Beat in vanilla.

With mixer on low speed, add flour mixture in three parts, alternating with the milk and beginning and ending with the flour; beat until just combined. Transfer mixture to a large bowl; set aside.

In the clean bowl of an electric mixer fitted with the whisk attachment, beat egg whites on low speed until foamy. With mixer running, gradually add remaining 1/4 cup sugar; beat on high speed until stiff, glossy peaks form, about 4 minutes. Do not overbeat. Gently fold a third of the egg-white mixture into the butter-flour mixture until combined. Gently fold in remaining egg-white mixture; stir in shredded coconut.

Divide batter evenly among the muffin cups. Bake 20-23 until the cupcakes are golden brown.

Coconut Cream Filling

5 tablespoons of heavy cream

1 can of cream of coconut – Blend well so the large coconut bits are dissolved

½ cup of sweetened coconut flakes

1/2 cup of cool whip

½ cup of cream cheese

  1. In a blender, mix the cream of coconut to get rid of large coconut chunks
  2. In a mixer, beat together the cream cheese, cool whip, and cream of coconut
  3. Add to the mixer 5 tbs of heavy cream – beat until you get it to the desired consistency. You want it thick, but not too stiff.
  4. Add is the coconut flake and beat until well mixed.
  5. Put your filling in a piping bag and fill each cupcake with this yummy coconut cream

Vanilla Buttercream Frosting:

3 1/4 cups powdered sugar

1 cup butter, at room temperature

1/2 teaspoon vanilla extract

2 tbs of heavy whipping cream

  1. With an electric mixer, beat together sugar and butter. Mix on low until well blended.
  2. Continue mixer on medium for another two minutes.
  3. Add vanilla and whipping cream, beating on medium for another minute.
  4. Frosting should be light and fluffy.

For toasted Coconut Flakes, simply heat your oven to 350, spread the sweetened coconut flakes out evenly on a cookie sheet and bake for about 5 minutes. Keep a close eye on them though, they burn quickly! Use the toasted flakes to top your delicious cupcakes.

Share with some friends and enjoy!

Stay Sweet, xoxo

Jill