Tag Archives: tips for baking

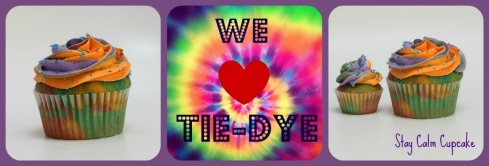
Funky Fresh Tie-Dye Cupcakes

18 Apr

What is more fun than Tie-Die?! Well, Tie-Die Cupcakes, of course! These colorful cupcakes are the perfect addition to any birthday party. With a simple vanilla base, the recipe is quick and virtually impossible to mess up. Get creative with your own color combinations and make your next party funky fresh!

Here’s the recipe – Enjoy!

Tie-Dye Cupcakes

Makes 15-18 Cupcakes

You’ll Need:

~ 2 cups all-purpose flour
~ 1 ½ cups sugar
~ 1 tablespoon baking powder
~ ½  cup milk

~ ¾  cup water
~ 1 teaspoons pure vanilla extract
~ ½  cup butter, softened
~ 3 eggs

~ 3 different colors of food coloring

Directions:

  1. Pre-heat your over to 350 degree
  2. With a whisk, combine flour, sugar, baking powder
  3. Add in the milk and whisk to combine.
  4. Add water, vanilla, butter, and eggs. Combine with an electric mixer then beat two more minutes.
  5. Divide the batter into 3 small bowls
  6. Color each bowl of batter a different color
  7. Line your cupcake pan with cupcake liners
  8. 8. Starting with one color, put a spoonful of batter into each liner
  9. Alternate colors until cupcake liners are ¾ full
  10. Bake at 350 for 12-15 Minutes.

Vanilla Frosting

  • 2 Sticks of unsalted butter at room temperature
  • 4 cups of powdered sugar
  • 2 tbs of vanilla extract
  • 3 colors of food coloring

In an electric mixer cream the butter until light and fluffy. I usually beat on medium speed for 3-4 minutes.

Slowly add in one cup of powdered sugar at a time. Mixing in between each addition

Add in the vanilla extract, mix to combine

(If your frosting is too thin – add more powder sugar. If your frosting is too thick, add in a tbs of milk.)

How to decorate with multi-colored frosting

  • Separate the frosting into 3 small bowls. Using food coloring, color each bowl a different color.
  • Cut the tip off your piping bag, insert the piping tip.
  • Use a medium size cup and fold the piping bag over the edges – this makes it easier to fill the piping bag with frosting.
  • Using a spoon or spatula, put one of the colored frostings into the piping bag. Alternate colors until your piping bag is filled with multi-colored frosting.
  • Pipe frosting onto each cupcake. Add sprinkles if you desire.

There you have it! Let me now f you have any questions.

Until next time, Stay Sweet!

Jill

Candy Apple Cupcakes

29 Aug

Happy Monday!

I hope everyone had a great weekend filled with yummy sweets and lots of relaxing. My weekend was packed with lots of baking, birthday parties, and puppy love. If you follow me on Facebook or Twitter, you will know that I recently got a new pup. His name is Hugo and he is such a love. I’m a new dog mom, so if any of you have advice, don’t be shy. Fill me in!

Let’s get to the sweet stuff though. I’ve been busy in the kitchen getting ready to launch all of my fall flavors on my Etsy shop. In doing so, I have come up with some awesome recipes that are sure to be huge hits at your office parties, family dinners, holiday get-togethers, and more.

I really love the flavor combination that a candy apple provides. With the start of school, it seemed like the perfect time to make candy apple cupcakes. A little sweet, a little tart, a lot of yummy! Almost a year ago, a friend of mine sent me a recipe for Caramel Apple Cupcakes. This recipes is very similar, but with a twist in the frosting.

Enjoy the recipe. Xoxo

Candy Apple Cupcakes

Ingredients:

2 1/4 cups all purpose flour
1 1/4 cups sugar
1/2 teaspoon baking powder
1/2 teaspoon baking soda
1/2 teaspoon salt
1 1/2 teaspoon cinnamon
1/2 teaspoon nutmeg
2 large eggs

1 Tbs of lemon juice
1/2 cup melted butter
1 cup applesauce
1 cup shredded or finely chopped, Granny Smith apples

Directions:

1.       Preheat your oven to 350 degrees. Prep a cupcake pan with liners.

2.       In a large bowl whisk together the flour, sugar, baking powder, baking soda, salt, cinnamon and nutmeg.

3.       In a mixer, stir the eggs, butter, and applesauce and lemon juice. Mix until combined. Carefully add the dry ingredients.

4.       Peel and slice the apple. Then using a grater, grate the apple into fine shreds, like cheese. You can also chop it finely which works just as well. Now stir the shredded apples into the batter mixture.

5.       Bake for 15-20 mins, I find that 18 minutes works best. You don’t want the inside of the cupcake to be mushy.

Photo from Just Jenn Recipes

Candy Flavored Frosting

I used a vanilla frosting base and drizzle red candy syrup over the top. I have seen people forgo the frosting and just dip the cupcake into the candy syrup (photo below). Either way will work and either way will be delicious!

For the frosting:

2 sticks of butter (unsalted)
1/2 cup butter (salted)
1 cup packed brown sugar
1/4 cup whole milk
3 cups powdered sugar, sifted
1 teaspoon vanilla extract
1tsp cinnamon
1Tbs of Apple Juice
½ Tbs of lemon juice

1.      In a mixer, beat 2 sticks of butter until light and fluffy. Add in 1 cup of powdered sugar and mix for 1 minute. Let sit

2.      In a saucepan on medium heat, melt the butter and brown sugar. When they are melted and bubbly, add the milk. Carefully raise the heat and bring the mixture to a quick boil. Careful – you don’t want to burn it. Once it foams up and turns that lovely caramel color, take it off the heat immediately.

3.      Remove pan from heat and stir in the remaining 2 cups of powdered sugar and vanilla, cinnamon and both apple and lemon juice, mixing until frosting is smooth.

4.      Let cool completely

5.      Once cool, slowly pour into your mixer and combine with the butter and sugar you previously prepared. Mix until light and fluffy. If your frosting is to thin, add more powdered sugar.

Mini Cupcakes dipped in Candy Apple Topping. Photo by HonestFare.com

Candy Drizzle

  • 2 cups sugar
  • 3/4 cup water
  • 1/2 cup light corn syrup
  • 2 teaspoons red food coloring
  1. Bring water, sugar, corn syrup to a boil in a small pot, add food coloring and reduce heat to a simmer. Watch the pot carefully cook it this way for about 20 minutes. After 12 minutes, check the temp using a candy thermometer .You need the candy to reach 310°F                                            (If you don’t have a candy thermometer, use the water test. Drip a few drops of the hot candy into a small bowl of room temp water. When the candy holds its form or makes ribbons, it is done.)
  2.  When candy is done, drizzle it over each cupcake. It will harden and make a very delicious topping for y our Candy Apple Cupcakes.

Stay Sweet and have a great week! xoxo

Strawberry Swirl Cake

12 Jul

Strawberry Swirl Cake

Summertime means Strawberries!

This recipe fits into the “semi –homemade” category of my recipe box. But don’t let that trick you, it tastes 100% homemade and delicious! The combination of strawberry, vanilla, and whip cream will have everyone begging for more. I promise!

What you will need:

  1. One box of Duncan Hines Vanilla Cake Mix
  2. One Box of Duncan Hines Strawberry Cake Mix
  3. 6 eggs
  4. Vegetable Oil
  5. Water
  6. 3 Cups of Chopped Strawberries
  7. 1/2 Cup of Marshmallow Fluff

Frosting:

  1. ½ Block of Cream Cheese
  2. 2 Sticks of Unsalted Butter
  3. 4 cups of powdered sugar
  4. 2 tbs of Strawberry Jello Powder
  5. Remaining Strawberry Puree

What your cake should look like before you bake it.

Directions:

  • Grease a cake pan (use any size you want. I used a small pan and only used half of the batter. It just depends how much cake you want J)
  • Preheat your over to 350 degrees
  • Prepare both cake mixes according to directions on the back of the box
  • Pour the marshmallow cream and chopped strawberries into a food processor. Process for 1 full minute.
  • Pour some of the vanilla batter on the bottom of your pan
  • Pour multiple lines of the strawberry cake batter on top of the vanilla batter.
  • Add 6 spoonfuls of strawberry mixture on top of the batter. Place the spoonfuls in various places around the pan. You want to use about half of the strawberry puree you previously made.
  • With a knife, swirl the batter and strawberry mixture together.
  • Bake for 25-30 minutes.

Frosting Directions:

  • While yours cake is baking, you can make the frosting.
  • In your mixer, cream together the butter and cream cheese. Whip until fluffy.
  • Slowly add in the powdered sugar. Mix well
  • Add in the remaining strawberry puree
  • Add in 2 tbs of Strawberry Jello Powder – Mix well.

Once your cake is cooled, frost the cake, cut and serve. Finish each slice with some whip cream and enjoy!!

Have a sweet Tuesday friends!

xoxo, Jill

Comfort Food Cupcakes

18 Feb

Photo courtesy of weheartit.com


Happy Friday my sweets!

Today I decided that I am going to post any green, four-leaf clover, St.Patrick’s day posts until March! Lately I have felt like the department stores, preparing for the next holiday before the previous one is even over. Valentine’s Day just ended and we have a good amount of time before we celebrate with the Irish. So I’m going to take a break on holiday postings. Is that ok with you guys?

Today I want to share with you one of my all time favorite, comfort food cupcake recipes. I don’t know about you, but I have had a pretty long, fairly stressful week. So this cupcake comes just in time – for me at least.

Nothing says homemade better than a carrot cake cupcake with bits of nuts, raisins, and delicious spices. Top it off with rich, tart, cream cheese icing, and this gal is in cupcake heaven. So please enjoy this recipe and remember that when life gets a little hectic, Stay Calm, and Have a cupcake! Xoxo

Carrot Cake Cupcake

(I used Marthat Stewart’s recipe and adapted it just a tad)

Makes 12 cupcakes – 24 minis

Ingredients:

  • 1 cup granulated sugar
  • 1/3 cup vegetable oil
  • 2 tablespoons orange juice
  • 1/2 teaspoon pure vanilla extract
  • 2 large eggs
  • 1 teaspoon baking powder
  • 1/2 teaspoon baking soda
  • 1/2 teaspoon ground allspice
  • 1/2 teaspoon salt
  • 3/4 cup plus 2 tablespoons all-purpose flour (spooned and leveled)
  • 1 1/2 cups shredded carrots
  • 1/2 cup chopped walnuts
  • 1/2 cup of rasins

 Directions:

  • Preheat oven to 350 degrees.
  • In a bowl, combine sugar, vegetable oil, orange juice, 1/2 teaspoon vanilla extract, and eggs.
  • Stir in baking powder, baking soda, allspice, and salt. Add flour; mix.
  • Stir in carrots, raisins, and walnuts
  • Divide batter evenly among muffin cups. Bake until toothpick inserted in centers comes out clean, 25 minutes. Let cool completely before frosting.

 Creamy Dreamy Cream Cheese Frosting

  • 2 packages of 8 oz. Cream Cheese
  • 3 cups of powdered sugar
  • 1 tbs of vanilla extract
  • 2 Sticks of unsalted Butter

Cream together cream cheese and butter – Mix on high speed up soft and well combined

Add the powder sugar one cup at a time – mixing thoroughly after each cup

Add in the vanilla and mix well

Beat on medium high speed until desired consistency is achieved.

ENJOY!!

So Yummy! I'm baking these tonight!

Stay Sweet!

Xoxo, Jill

Left-Over Cupcake Batter

15 Feb

Freeze! Don't throw it away!

I can’t tell you how many times I have made a full bowl of batter just to make 6 little cupcakes! I finally decided that I would try freezing my left-over batter in a glass pyrex container. I didn’t know if it would work or not, but it was better than wasting all the left-overs. The next time I needed to make cupcakes, I took the batter out, let it thaw ahead of time, and made my cupcakes as usual. I anxiously tasted the cupcakes after they had cooled, and to my wonderful surprise, they were fabulous, and still so fresh!! An added perk? When baked,  the thawed batter formed the most beautiful cupcake peaks!

I have saved myself so much time and money with this simple trick. So here are a few pointers for saving your batter:

  1. I have tried saving in both plastic and glass Tupperware. I wasn’t happy with the way the plastic Tupperware preserved my batter. I now use soley glass Tupperware with a very secure lid.
  2. Frozen batter only lasts for 7-10 days in the freezer. Any longer and it doesn’t rise or taste good at all. The sooner you can use it, the better.
  3. Make sure all of the air is released from the Tupperware. The more air you have, the more ice crystals will form. No one like frostbitten cupcake batter!
  4. Don’t use the microwave to thaw your batter. Give your batter a few hours to thaw before you are going to bake.
  5. Make sure you label your batter with the flavor and the date – that way you don’t forget what it is, or when you first made it.

I hope this trick saves you as much time and money as it has saved me! Have a sweet day!

Xoxo, Jill

Monday Pick-Me-Up Cupcake

31 Jan

Coffee Cupcakes!

Alright, as promised, here is a yummy cupcake recipe to kick off your week right!

Dark Chocolate Coffee Bean Cupcakes

Cupcake:

  • 1 1/8 cups all-purpose flour
  • 1/4 cup Ghirardelli Unsweetened Cocoa
  • 1 1/4 teaspoons baking soda
  • 1/4 teaspoon salt
  • 1 large egg
  • 1/2 cup firmly packed light brown sugar
  • 1/2 cup granulated white sugar
  • 1/2 cup and 2 tbs of whole milk  
  • 1/3 cup strongly brewed coffee
  • 1/2 cup unsalted butter, melted

Directions:

  • Preheat the oven to 350 degrees F. Line Cupcake Pan with liners
  • Sift together the flour, cocoa, baking soda, and salt.
  • In a mixer on medium speed, whisk together the egg, brown sugar, and white sugar. Add in the milk, coffee, and melted butter.
  • Slowly whisk in the dry ingredients.
  • Bake for 15 minutes.

Frosting

  • 1 teaspoon instant coffee granules
  • 2tbs of brewed coffee
  • 1/4 cup milk
  • 1/4 cup unsweetened cocoa powder
  • 6 tablespoons butter or margarine
  • 1 1/2 teaspoons vanilla extract
  • 4 cups confectioners’ sugar – add more for a thicker consistency

Directions:

  1. Cream Butter and powdered sugar in a mixer on medium high speed.
  2. Mix together instant coffee, brewed coffee, milk, cocoa powder, vanilla extract
  3. Add to mixer and whisk on medium high for about 3 minutes or until desired consistency is reached.
  4. Put in piping bag and frost your cupcakes
  5. Garnish with coffee beans or chocolate shavings if desired

The perfect morning pick-me up or after dinner treat! Enjoy!

Xoxo,

Jill

**Image courtesy of http://ladylorien.tumblr.com/page/2 **

Sprinkles, Aprons and Minis

28 Jan

Happy Friday everyone!

I don’t know about you – but I am so glad the weekend is here! Today’s post is a mix-up of a few different things (all cupcake related though..of course!)

Every wonder how professional cupcake bakers get the perfect amount of sprinkles around the edge of their frosted cupcake? Me too, until I just tried it and realized it’s not hard at all!

Once you’re cupcake is frosted, pick out the type of sprinkles you want to use. Pour 1.5 Tablespoons of sprinkles into the palm of your left hand. Holding the cupcake in your right hand, dip the edge of the cupcake’s frosting in the sprinkles – rotate the cupcake’s edge in the sprinkles until you have made a complete circle. Fill in any spots that aren’t covered and VOILA – a very professional looking sprinkle job!!

Whats better than sprinkles?!!?

But what about looking the part?? Every cupcake baker needs an apron! My new sponsor Apron Queen  has just what you are looking for! Her shop is filled with the most adorable aprons and gloves!

Here are some of my favorites:

Cupcake Apron for Cupcake Baking!

"Diva Dish Gloves" by Apron Queen

Everyone looks cute in Pink Polka Dots!

 Stop by and check out her shop – if you don’t see a pattern you like, she will be happy to create a custom design just for you! I’m still trying to decide which apron I want to buy!


Feel like cupcakes but don’t feel like making them yourself? Good news…Today’s Special on Stay Calm Cupcake Shop is a 6 pack of Mini Cupcakes for only $3.00!! Head on over and order yours while supplies last.

Stay Sweet!

Xoxo, Jill

Mini Party Cupcakes

25 Jan

Miniature Party Bites!

I love these miniature little cupcakes for several reasons:

1) They are so darn easy  to make!!

2) They look beautiful and require little to no decorating skills

3) They add the perfect amount of “pazzaz” to any birthday party!

So let’s get started! For these cupcake you will need a miniature cupcake pan and miniature cupcake liners.

I chose to make a vanilla butter cake as my base – you can use whatever yummy recipe you feel comfortable with.

Vanilla Butter Cake:

  • 2 1/2 cups flour
  • 1 tablespoon baking powder
  • 1/2 teaspoon salt
  • 1 cup milk
  • 3 teaspoons vanilla extract
  • 1 cup (2 sticks) unsalted butter or margarine, softened
  • 2 cups sugar
  • 4 large eggs

Directions

  1. Preheat oven to 350ºF.
  2. In medium bowl, stir together flour, baking powder and salt. In measuring cup, mix milk and vanilla.
  3. In large bowl, with mixer at medium-high speed, beat butter and sugar until light and creamy, about 5 minutes. Add eggs, one at a time, beating well after each addition. Reduce speed to low; add flour mixture alternately with milk mixture, beginning and ending with the flour mixture. Beat just until smooth, scraping the bowl occasionally with a  spatula.
  4. Pour batter into cupcake liners (I usually fill them close to the top of the liner that way they puff up nicely) and bake for about 18-20 minutes.
  5. Let cool completely before frosting the cupcakes.


Vanilla Buttercream Frosting: 

  • 3 1/4 cups powdered sugar
  • 1 cup butter, at room temperature
  • 1/2 teaspoon vanilla extract
  • 2 tbs of heavy whipping cream
  • 1/4 tsp of lemon juice
  • 1/4 tsp of orange juice
  • Rainbow colored sanding sugar
  1. With an electric mixer, beat together sugar and butter. Mix on low until well blended.
  2. Continue mixer on medium for another two minutes. 
  3. Add vanilla and whipping cream, beating on medium for another minute.
  4. Now here’s my secret…I add a little bit of lemon and orange juice to this frosting. This gives it a hint of fruity flavor that makes the mini cupcake even more fun! Kids love it too! Omit this step if you want a pure vanilla buttercream
  5. Frosting should be light and fluffy.

Fill a piping bag with your frosting. Cut the tip off so there is a small hole. Pipe the frosting onto each cupcake – leaving only a dollop of frosting on each – do not worry about spreading out or piping in a design.

Pour your multi-colored sanding sugar onto a plate.

Dip each frosted cupcake into the sprinkles – smashing the frosting down around the top of the cupcake.

And there you have it – gorgeous, colorful, and delicious cupcakes that were super easy to make!! You’re cupcakes are going to be a hit at any party you bring them too. I just know it!

Stay sweet xoxo

Stay Calm Cupcake!

** Follow me on Twitter @ StayCalmCupcake – I only need 27 more followers and I will give away 2 free cupcake kits!! **

Fresh Berry Frosting

20 Jan

25 days til Valentine's Day !

Can you believe it is already the end of January?!? I do not enjoy how fast time is flying. Seems the older I get, the more I find myself questioning where the heck the time went!! It doesn’t help that many stores had Valentine’s decorations and candy on sale before Christmas was even over. I LOVE Valentine’s day – but they started pushing it a little early this year!

Speaking of , there are officially 25 days left until Valentine’s Day. Which means we all still have a decent amount of time to think about what we are going to get that special someone on the day that celebrates love! It also means that for the next 25 days, I have an awesome excuse to bake, decorate, and eat tons of girly pink cupcakes!

Today I want to share some Valentine Inspiration with you. Hopefully this will help you start thinking about the many SWEET ways we can celebrate Valeninte’s Day – starting with fresh Strawberry Frosting!

**The frosting in the pictures is my Strawberry Buttercream. Unfortunately, I do not have a picture of my Fresh Strawberry Frosting. **

Fresh Strawberry Frosting

This yummy strawberry frosting is perfect for any chocolate, vanilla, or lemon cupcake. It is fresh, elegant, and taste amazing! The pink color and the fresh strawberries make it the perfect Valentine’s treat. This frosting is different from my Strawberry Buttercream, but just as easy and just as yummy! 

 Ingredients

1.    4 cups of fresh strawberries (frozen will work just as well, make sure you thaw them though)

2.    1 stick of room temperature butter

3.    8 oz of low-fat cream cheese

4.    ½ tsp of vanilla extract

5.    4 cups of powdered sugar

6.     1 cup of white sugar

7.     2 tbs of water Pink food coloring (optional)

Directions

• In a mixer on medium high speed with your paddle attachment, cream together the butter and cream cheese

• Slowly add in the powdered sugar one cup at a time, making sure it is fully combined before adding the next one.

• Add the vanilla and mix on high for 3-5 minutes

• Dice up the strawberries in small cubes, put in a medium sauce pan

• Add 1 cup of white sugar and 2 tbs of water to the strawberries

• With a potato masher, mash the strawberries together with the sugar

• Heat on medium heat until mixture comes to a boil.

• Let cool in the fridge until mixture thickens

• Add the cooled strawberry compote to the mixer and combine with the frosting (make sure your strawberries are completely cooled or you will ruin your frosting) Mix for 2 minutes.

• Add pink food coloring for a pinker frosting (optional)

XOXO

There you have it, yummy strawberry frosting! I like this frosting best on top of a chocolate cupcake- it’s a fun take on chocolate covered strawberries 🙂 After all, who doesn’t love strawberries and chocolate!

Enjoy the recipe and keep an eye out for a Valentine’s Giveaway – coming soon!!!

Xoxo Jill

*All photos are property of Stay Calm, Have a Cupcake. Photos by ABYoung Photography**

Coconut Pecan Frosting

13 Jan

Coconut Pecan Goodness!

Since I’m on this coconut kick, I decided to make German Chocolate cupcakes. And no German Chocolate cupcake is complete unless it has the traditional coconut pecan frosting. It’s the perfect mix of sweet and nutty that compliments the bitter chocolate cupcake so well.

This was my first time making this frosting, so I went to the trusted Martha Stewart cupcake book for her take on the frosting.

Here’s the recipe, with a few of my own little tweaks and notes:

Coconut Pecan Frosting

Makes enough for one 9-inch 3-layer cake (or 36 cupcakes!)

Ingredients

  • 3 large egg yolks
  • 1 can (12 ounces) evaporated milk
  • 1 1/4 cups packed light-brown sugar  (I used dark brown for a richer flavor and really liked the result!)
  • 1 1/2 sticks (12 tablespoons) unsalted butter, cut into small pieces and brought to room temperature
  • 1 teaspoon pure vanilla extract
  • 1/4 teaspoon salt
  • 2 2/3 cups (7 ounces) sweetened flaked coconut (Make sure you chop up the coconut. Sometimes the strings in the bag are way too long and makes for messy eating)
  • 1 1/2 cups (6 ounces) pecans, toasted and coarsely chopped (I did not toast mine, bc I think it gives a very strong pecan flavor that over powers the frosting – but it’s a matter of preference)

Directions

  1. Combine egg yolks, evaporated milk, and brown sugar in a saucepan. Add butter, and cook over medium heat, stirring constantly, until thick, about 10 minutes. (Should be the consistency of pudding)
  2.  Pour through a fine sieve into a bowl.
  3. Stir in vanilla, salt, coconut, and pecans. Let cool completely. Frosting can be refrigerated in an airtight container for up to 1 day; bring to room temperature before using.

Enjoy this frosting on top of any chocolate dessert! Stay Sweet xoxo